I'm looking at completely updating the panel on my M5.
My thought is that the best way to gain access to the work area behind the panel is to remove the windscreen, the glare shield, and perhaps the fuselage side panels. The glare shield needs an overhaul anyway. Seems like a good time to install the modular instrument panel while we're at it.
Another option, however, is to use a die grinder to cut the existing panel leaving enough edge to install plate nuts. Then create a new panel face that would screw onto the remaining frame via the plate nuts and mount the avionics/instruments in the new panel. This would give me a removable panel without having to go through removing the windscreen and glare shield. Has anyone else done anything like this?
I'd actually rather go with the first option but I'm not sure how much work I'm getting into trying to remove the existing panel, glare shield, side panels, etc. It seems like it would be worth spending a couple of days taking it apart and another couple putting it back together if that's all it is.
Looking for feedback on how any of you have done panel upgrades short of just spending a lot of time on your back looking up into a black abyss.
Instrument Panel Re-Do
-
snaproll

- Posts: 82
- Joined: Sun Mar 13, 2016 3:56 pm
- Contact:
-
gbarrier
- 100+ Posts
- Posts: 1562
- Joined: Thu Jul 14, 2011 5:41 pm
- Location: 9NR4 North Carolina
- Contact:
Re: Instrument Panel Re-Do
Option 2 is a good one. Did it but just used #4 sheet metal screws spaced around the edge to put it back. While I was at it j made new panel to handle a couple G5s and eliminated one row of holes so the G5s were directly centered over the column.
-
wtxdragger

- 100+ Posts
- Posts: 244
- Joined: Sat Nov 09, 2013 3:46 pm
- Location: Iraan,Texas
- Contact:
Re: Instrument Panel Re-Do
I'm thinking we all contemplate this often, I know I do.
If you go through with it, either way, please post pictures.
Thanks in advance.
If you go through with it, either way, please post pictures.
Thanks in advance.
Mercifully Free from the Ravages of Intelligence
1989 M7-235 N90KD
1975 T210L N1675X
2022 CCK-1865 N922UM
https://www.instagram.com/wtxdragger/
1989 M7-235 N90KD
1975 T210L N1675X
2022 CCK-1865 N922UM
https://www.instagram.com/wtxdragger/
-
Andy Young

- 100+ Posts
- Posts: 1548
- Joined: Wed Oct 05, 2011 7:10 am
- Location: Alaska, Antarctica, Colorado, and Others
- Contact:
Re: Instrument Panel Re-Do
Removing the boot cowl will involve drilling out a lot of rivets, but if you are experienced at this, it’s not a bad job. Depending on your skill level, you should be able to remove the windshield, glare shield, and boot cowl in one day. In theory, putting it back together should take about the same amount of time, but it’ll probably be a bit more fiddly, and take a bit longer. When you put it back, you could choose to use removable fasteners, to make access to this area easier in the future.
Anyway, having recently removed my boot cowl and windshield (and a lot of other stuff) I would definitely choose to do it this way if I was doing a full panel re-do. The access is amazing with the boot cowl off. So much less painful and frustrating.
Anyway, having recently removed my boot cowl and windshield (and a lot of other stuff) I would definitely choose to do it this way if I was doing a full panel re-do. The access is amazing with the boot cowl off. So much less painful and frustrating.
Last edited by Andy Young on Fri Dec 04, 2020 7:25 pm, edited 1 time in total.
-
Andy Young
- 100+ Posts
- Posts: 1548
- Joined: Wed Oct 05, 2011 7:10 am
- Location: Alaska, Antarctica, Colorado, and Others
- Contact:
Re: Instrument Panel Re-Do
Wouldn't it be great if boot cowls had big access doors in them for working behind the panel? If I ever build an experimental, I might just do that...
-
maules.com
- 100+ Posts
- Posts: 3144
- Joined: Tue Aug 29, 2006 4:01 pm
- Contact:
Re: Instrument Panel Re-Do
The boot cowls are basically non structural. It would be easy to install a curved hatch in each side for access. a stiff frame on boot cowl and nut plates or Dzus fasteners. 337 no doubt. I have seen it done.
-
Curtis
- 100+ Posts
- Posts: 117
- Joined: Mon Mar 07, 2011 5:06 pm
- Contact:

-
snaproll
- Posts: 82
- Joined: Sun Mar 13, 2016 3:56 pm
- Contact:
Re: Instrument Panel Re-Do
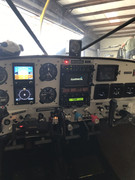
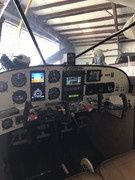
Thanks everyone. Very helpful information. Curtis, nice panel!
-
wtxdragger
- 100+ Posts
- Posts: 244
- Joined: Sat Nov 09, 2013 3:46 pm
- Location: Iraan,Texas
- Contact:
Re: Instrument Panel Re-Do
Curtis, Very nice panel.
Did you go the trim your old panel or the new Maule Component version?
I looked back through your posts, but could find a picture of construction.
Did you go the trim your old panel or the new Maule Component version?
I looked back through your posts, but could find a picture of construction.
Mercifully Free from the Ravages of Intelligence
1989 M7-235 N90KD
1975 T210L N1675X
2022 CCK-1865 N922UM
https://www.instagram.com/wtxdragger/
1989 M7-235 N90KD
1975 T210L N1675X
2022 CCK-1865 N922UM
https://www.instagram.com/wtxdragger/
-
Curtis
- 100+ Posts
- Posts: 117
- Joined: Mon Mar 07, 2011 5:06 pm
- Contact:
Re: Instrument Panel Re-Do
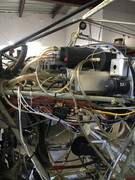
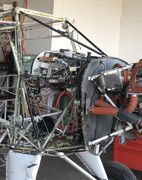
I cut the original out leaving about a 1/4” lip except where I was placing a screw to hold the panel. Then I cut the panel out on a router table. We build a lot of customized panels so it was nice being already set up with all the dimensions for the instruments on the cad program. Once that I got the layout that I liked it was pretty simple to make the panel.
Then I took it over to the bench, installed the instruments and installed it in the aircraft. As for the screws, I drilled the tabs (the tabs, that I had left when I cut the original panel out) and installed riv-nuts.
However, before I cut the old panel, I had located, on the cad program, where the screws needed to go as to not interfere with the instrumentation.
It is extremely nice to have access to everything without laying on your back all cramped up on the floor of the airplane.
Curtis
Who is online
Users browsing this forum: No registered users and 22 guests