M-4 Rebuild Project - Seat/Seat-Belt Brackets Installation

Discussion on keeping your aircraft airworthy and legal and/or any technical topics.


Post Reply
User avatar
THEAirplanegirl
Posts: 15
Joined: Mon Dec 12, 2022 5:08 pm
Contact:

M-4 Rebuild Project - Seat/Seat-Belt Brackets Installation

Post by THEAirplanegirl »

Hey Ya'll!

I have a couple of questions... & hoping some of you very experienced Maule people have the answer! Currently, I am working on the fuselage of the M-4 getting it all ready for when the interior returns from Oregon Aero & for the avionics rewire. I removed every single wire out of the plane & plan to start from scratch!

1. One of my big items on this aircraft was to replace the front bench seat with two bucket seats. I was able to find someone willing to sell me an old pair of M5 seats and those are the ones I shipped out to get reupholstered. I spoke with several people at Maule including Bruce and David, making sure this was in fact possible on my #56. They helped me put together a parts list of the brackets...ect. that I would need to accomplish this.

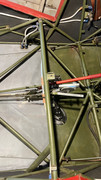
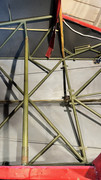
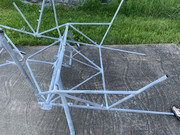
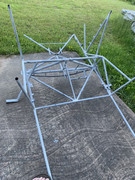
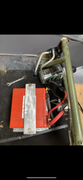
I am having a hard time figuring out where exactly these brackets need to be welded in. I am assuming I need to remove the old bench-seat seat lock and will need to weld in two separate seat locks for the bucket seats. They only sent me one seat lock and I have another one coming. I have looked through all of the M-4 parts catalog and diagrams and can't find anything about the installation of these brackets and such. I threw in a couple pictures below of the parts I was sent and the current status of my M-4.

2. With this, I am also working on replacing my old floorboards. Currently they are thick 3-ply plywood with black closed-cell foam on the back. Not sure if the foam backing is what people are regularly doing now and if I should do something similar on my new ones...? I ended up purchasing 5-ply Marine grade Okoume and can already tell it is a lot lighter.

My question with this is how are the floor boards suppose to be secured down? I have seen from other people's post & per the floor board tab assembly drawing #1146F, there appears to be (9) AN3-5A bolts. Is there something else I need to weld in for these bolt to attach to? My plan is to leave it the natural wood look and not replace any type of carpeting... but obviously I need these secured down.

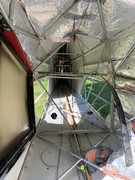
3. Lastly, I removed the old headliner & plan to replace it with a new one I got from Aircraft Spruce once the rewiring is finished. However, I am unsure what I should do about the old original insulation.I have seen a lot of talk about how it can lead to corrosion. I do already see some rusting on the upper tubing... I am trying to figure out if I should remove the old insulation and replace it with new insulation or leave insulation out all together? If replace... what is the best insulation for this? The previous owner who started this project had purchased the black closed-cell insulation and placed that all along the side paneling as you can see from the pictures... Not sure of that would be a good replacement or just some new fiberglass insulation. I will be having my family including my young son flying in this plane. We live in Michigan where the winters can be cold... so keeping the cabin as warm as I can is definitely a priority.

Thank you in advance to whoever took the time to read my post! This has already been such a great aviation community to be apart of!

Thea

Image

Image

Image

Image

Image

Image
Thea
M-4 N4713T

User avatar
Mog
100+ Posts
Posts: 974
Joined: Fri Nov 26, 2010 8:01 pm
Location: Dallas, TX
Contact:

Re: M-4 Rebuild Project - Seat/Seat-Belt Brackets Installation

Post by Mog »

First, I recommend removing all the insulation. That is unless you fly in super cold climates. If so then replace with something modern I guess.

Second, there are at least two methods for the floor boards. One is effectively a quick release version and the other is like mine and screws into each of those little tabs. It’s a royal pain to remove and install. The easy version has a bolt welded to the frame and a large washer and nut hold it all in place. My buddy has the east version and man does his floor come up fast. Mine takes a bit and then takes forever to put back.

Old Piper
100+ Posts
Posts: 112
Joined: Fri Sep 10, 2010 7:19 pm
Location: New York '75 M5-210C, Rebuilding (2) M7-235C for retirement sanity.
Contact:

Re: M-4 Rebuild Project - Seat/Seat-Belt Brackets Installation

Post by Old Piper »

Hi Thea,

As for seat brackets, I can look for pics to post of the M5 that may help. Look close at the partial fuselage and you’ll find the studs vertical for the flooring and the seat brackets and the tube on the Passenger seat (right front tube - forward side) for the lock welded in.

The floor boards, I have the small studs with washers/nuts that hold them down. They are welded on and makes it easy to install the floorboards.

I agree with Mog on insulation, but if you do put some in, I have found the ‘Electric Hot Water blanket’ insulation works, it’s not to thick and has a vinyl white cover for a vapor barrier(and retains the insulation better). As a min. I would install the firewall and around boot cowl area. All the rest is as needed, and can be done later, except headliner.

While you’re at it, shoulder or 4-pt. Weld points for seat belts if not installed. Also any additional tie down tabs if needed in back area for cargo.

I’ve used the Stewart System for covering and suggest it.

As always, refer to drwgs. And make sure your IA is in agreement with your goals.

Good luck and stay at it. I hope this helps. These pics are from a 1975 M5-210c.

Tom

Image

Image

Image

Image

Dkuber
Posts: 49
Joined: Sun Oct 25, 2020 12:07 pm
Contact:

Re: M-4 Rebuild Project - Seat/Seat-Belt Brackets Installation

Post by Dkuber »

Image

Not the best pic of the front seat attachment points but might give you some help. I think when you build the seats with the hardware it will become pretty obvious where they need to be mounted. Not a lot of lateral room to spare.

I pulled all the insulation out of mine. Did not re-insulate. Make sure your doors are sealed pretty good but for mine the biggest difference was completely sealing where the gear attaches. That was like closing a window. My 220 has lots of heat now. If it is above -20F, I can’t run full heat after about 15-20 minutes, mine lives outside in AK. I don’t preheat the cabin, just the engine with diesel but I do pull the heater open and get a couple degrees inside. For a long time I thought my draft issue was the wing root, still have not done anything up there. The doors and gear area was plenty.

User avatar
andy
Site Admin
Posts: 1666
Joined: Mon Aug 06, 2007 2:05 pm
Location: Lake James, NC, USA
Contact:

Re: M-4 Rebuild Project - Seat/Seat-Belt Brackets Installation

Post by andy »

Hi, Thea. I would thoroughly tape all the joints that lead to the outside, especially the wing roots then replace the insulation with new fiberglass insulation with a backing. There are lots of places where air can leak in and the heat muffs only can do so much to keep the cabin warm. The most effective thing you can do to warm up the cabin is block the air leaks from the wing roots, doors and windows. My MX-7-180 was really cold inside during the winter before Maule Flight rebuilt the airplane. They sealed the air leaks and now the front and rear seat heat is great.
Andy
1986 MX7-180
Image

User avatar
Andy Young
100+ Posts
Posts: 1547
Joined: Wed Oct 05, 2011 7:10 am
Location: Alaska, Antarctica, Colorado, and Others
Contact:

Re: M-4 Rebuild Project - Seat/Seat-Belt Brackets Installation

Post by Andy Young »

From my experience, I advocate not installing any insulation. I operate an M-6 in Alaska. I long ago removed all of my insulation and my airplane is plenty warm, even in below-zero conditions. I cannot even tolerate having the heat on all the way unless it’s below about 10° or so. I do have a headliner, and keep my wing root areas taped up (between the wing leading edge and windshield) and have mostly eliminated the air leaks around my doors.

It is worth stating that your heat situation may vary, depending on your engine model and heater design. I have an injected IO-540, which has two large mufflers, each of which has a heater shroud on it. BOTH of these feed into the cabin, whereas as carbureted models, only one does, with the other feeding carb heat.

The fiberglass insulation in particular tends to hold water and promote corrosion. I did find some in mine when I rebuilt it.

Post Reply

Who is online

Users browsing this forum: No registered users and 53 guests